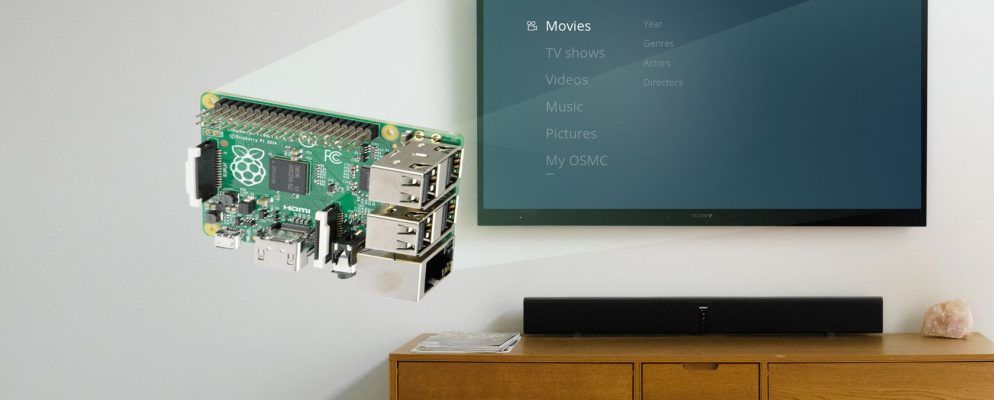
试图将Raspberry Pi变成媒体中心,但感到失望吗?
在Raspberry Pi上缺少Netflix和Amazon Video等重要频道吗?花哨的时间安装Plex来访问您家庭网络上的内容。
幸运的是,Kodi不仅涉及非法附件。这是在Raspberry Pi上安装Netflix,Amazon Video和Plex的方法。
您需要Raspberry Pi 3
在继续之前,请确保您正在使用Raspberry。 Pi 3或更高版本。我们使用了Raspberry Pi 3 B +。尽管Raspberry Pi 2可以,但后来的型号在流媒体和解码Netflix和Amazon Video的数据方面表现出色。
真实性检查:是否曾经尝试过让Netflix或Amazon Video附加组件正常工作在基于Raspberry Pi的Kodi盒上,您会知道它的技巧(令人沮丧)。
通常,这些问题是由于不良附加组件(或只会导致附加组件的组合)引起的。与台式PC Kodi安装一起使用)和较低版本的Raspberry Pi。如果您使用的是Raspberry Pi 3 B +,则以下步骤将允许您通过Kodi访问现有的Netflix和Amazon Video订阅。
使用OSMC在Raspberry Pi上安装Kodi
为了使Netflix,Amazon Video和Plex的工作量最小,您需要使用OSMC(开源媒体中心)。 OSMC是可用于Raspberry Pi的多个Kodi版本之一
从osmc.tv下载安装程序,它可以自动将OSMC写入microSD卡的过程。 (您也可以按照常规方式下载磁盘映像并安装在Raspberry Pi上。)
在安装程序中进行操作,确保选择最新的OSMC版本。提示时,您可能还想设置您的无线网络。您的microSD卡上必须有映像。此“每晚构建"足够稳定,可以运行稍后安装的Netflix加载项。
首先,打开终端或通过SSH连接到OSMC,然后输入:
sudo nano /etc/apt/sources.list在文件中,将此行添加到底部;
deb http://download.osmc.tv/dev/gmc-18 gmc-18 main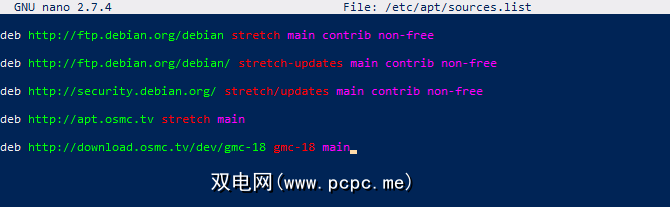
按 Ctrl + X 保存并退出。接下来,添加GPG证书以验证源:
wget -qO - http://download.osmc.tv/dev/gmc-19/public/pubkey.asc | sudo apt-key add -下一步是更新源列表:
sudo apt update然后您可以运行内核升级:
sudo apt dist-upgrade -y通过降级到新的版本来完成此操作。
sudo apt install rbp2-mediacenter-osmc=17.8-433 -y这可能需要一段时间,请耐心等待。完成此步骤后,安装pip:
sudo apt install python-pip python-crypto build-essential -y通过安装以下依赖项来完成此操作:
sudo apt install python-all-dev python-setuptools python-wheel -ysudo apt install python-crypto-dbg python-crypto-doc python-pip-whl -y这些依赖项将确保您将要安装的所有内容都能按预期运行。
Install and Configure Plex for Local Media Streaming
是否要流式传输来自网络上其他设备的视频,音乐或照片?您需要在PC上安装Plex服务器,在Raspberry Pi上安装客户端附加组件。
在Raspberry Pi上运行OSMC的情况下,浏览至 Settings>附加组件浏览器>从存储库安装>视频附件。滚动浏览列表,直到找到Plex,然后选择并安装。单击确定确认并等待完成。
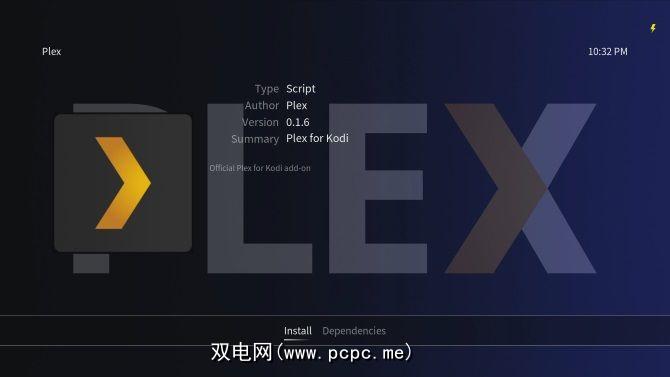
完成后,使用 Restart 选项重新启动Raspberry Pi。
发生这种情况时,为什么不查看我们的Plex指南以获取有关此出色流解决方案的信息和提示?或者,也许您想了解一些您应该使用的隐藏Plex设置。
Install and Configure Amazon Video on Raspberry Pi
想要在Raspberry Pi上流Amazon Video?这就是您需要做的。
留在终端(或SSH客户端)中,是时候安装Amazon Video插件了。开始使用 wget 命令直接从GitHub下载ZIP文件:
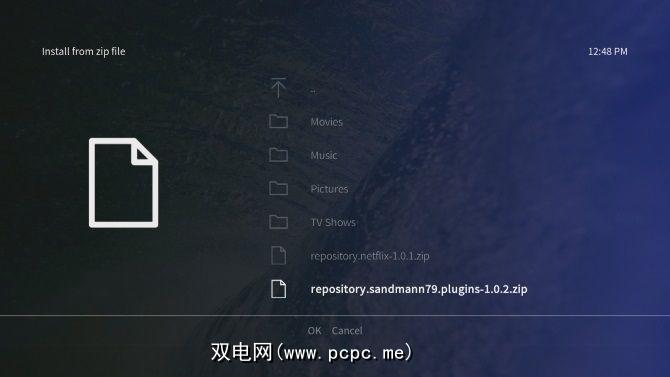
wget https://github.com/Sandmann79/xbmc/releases/download/v1.0.2/repository.sandmann79.plugins-1.0.2.zip完成此操作后,将注意力转移到电视上并导航至< strong>设置>附加浏览器>从Zip文件安装。系统会通知您无法从未知来源进行安装,因此请选择设置,然后选中未知来源旁边的框。选择是确认决定,然后返回主屏幕并返回从Zip文件安装选项。
在这里,选择根文件系统,然后找到前往 home> osmc> repository.sandmann79.plugins 的方式。
选择此项,等待其解包,然后浏览并找到 Settings> Add -在浏览器上>从存储库安装。转到 Sandmann79s存储库,然后找到视频附件。在这里,选择 Amazon VOD (对于德国用户,则称为“ Amazon")。
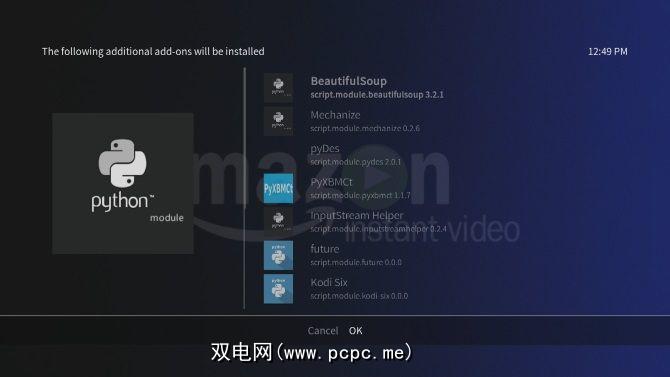
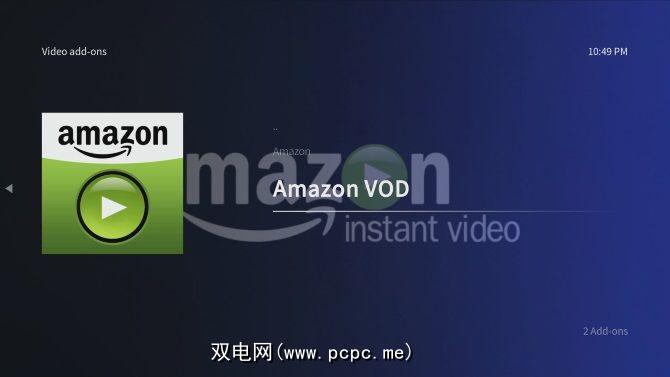
Select Install, then confirm with OK. Note that some additional add-ons will be installed (see above image). Leave it to finish, then reboot your Raspberry Pi. When it restarts, it’s time to configure the add-on. Browse to Settings > Add-on browser > My Add-ons > Video Add-ons, and select Amazon VOD.
Go to Configure, and in the General view change the Playback option so that Input Stream is selected. Then, in the Connection view, select Sign In and input your Amazon account credentials. If you have two-factor authentication enabled on your Amazon account, you’ll be prompted to enter the code that has been sent to your device.
,您就可以开始观看Amazon视频内容了!您会在附加组件下找到Amazon VOD。
Install and Configure Netflix on Raspberry Pi
接下来让我们看看在Raspberry Pi上流Netflix。
要在Raspberry Pi上安装Netflix Client,您需要:首先需要执行一些次要配置。在终端中,输入:
pip install pycryptodomex这是运行Netflix所需的依赖项。加载项需要知道它在哪里,因此添加一个符号链接:
sudo ln -s /usr/lib/python2.7/dist-packages/Crypto /usr/lib/python2.7/dist-packages/Cryptodome下一步,从GitHub下载加载项本身。
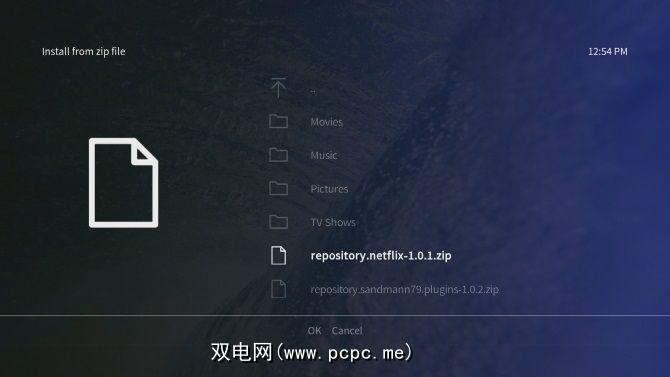
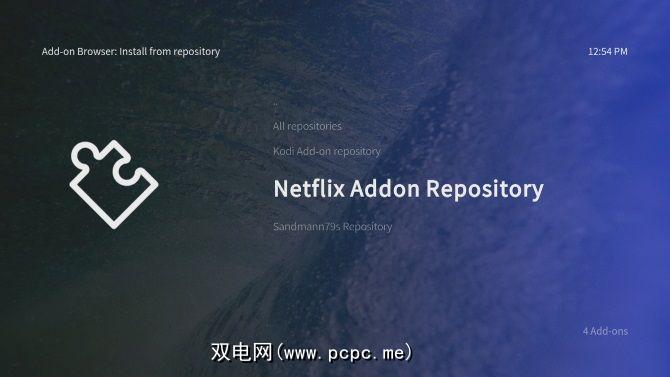
wget https://github.com/kodinerds/repo/raw/master/repository.netflix/repository.netflix-1.0.1.zip将注意力转移到电视上并浏览到ZIP文件:设置>附加浏览器>从Zip文件安装。在根文件系统下,找到 home> osmc> repository.netflix-1.0.1.zip ,然后选择 Install 。
等待通知,然后返回并浏览至设置>加载项浏览器>从存储库安装> Netflix Addon存储库,然后是视频加载项。在这里您可以找到 Netflix ;选择安装,选择最新版本,然后单击确定。
With this done, restart your Raspberry Pi. When it reboots, you’ll need to configure the add-on with your Netflix credentials.
Open Settings > Add-on browser > My add-ons > Video add-ons > Netflix, select Configure, then find Account. Under Switch Account, enter your credentials.
You’ll also need to configure the InputStream module. In Settings > Add-on browser > My add-ons, find VideoPlayer InputStream and select InputStream Adaptive.
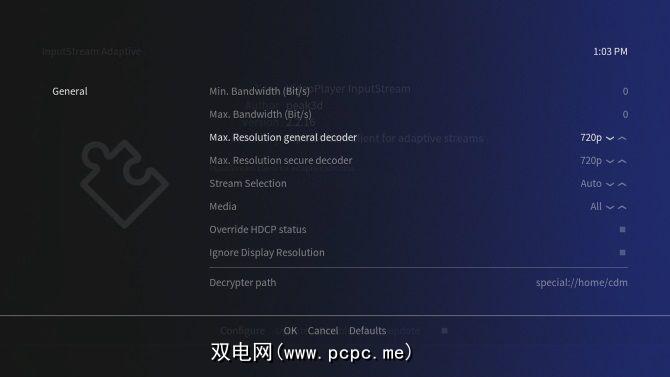
Choose Configure, then set MaxResolution general decoder and Max Resolution secure decoder so that they match the resolution of your TV.
单击确定并确认。。 p>
Lastly, Install and Configure Widevine CMD
到目前为止,您已经安装了Plex,Amazon Video和Netflix。差不多可以了,但是在观看任何内容之前,必须先下载Widevine CMD解密模块。但是,您不能手动执行此操作;相反,它需要由Amazon或Netflix加载项完成。
选择任一加载项,选择视频并播放。您会立即收到通知,告知需要下载Widevine CMD。请注意,由于这是专有模块,因此不是开放源代码。
选择安装Widevine 并按照说明进行操作。

Chrome操作系统恢复映像可以从中下载许多文件,以提取Widevine CMD。这可能需要一段时间才能下载和解压缩,因此,在OSMC显示以完成安装的所有请求之后,让Raspberry Pi以自己的速度工作。
一旦安装了Widevine CMD,最好重新启动您的上一次是Raspberry Pi。
您的Raspberry Pi现在是终极媒体中心
就是这样:您现在可以在Raspberry Pi上流式传输Netflix和Amazon Video,它可以轻松地流式传输视频通过Plex从网络上的另一台计算机上获取。简而言之,您的基于Kodi的Raspberry Pi媒体中心再好不过了。
如果您对使用Raspberry Pi实时直播YouTube感兴趣,请查看我们的帮助指南。
还有其他的Raspberry Pi吗?以下是将Raspberry Pi设置为Plex媒体服务器的方法。
标签: Amazon Video Media Center Media Server Media Streaming Netflix Plex Raspberry Pi